Testing Procedure
Obtaining accurate results performing a fuel consumption test is more difficult than you may think. There are many variables that can affect the outcome of an “over the road” test which include, weather, road conditions, temperature, tyre pressure, traffic, and driving style to name just some. When performing an “over the road” test, it is desirable to select a route where cruise control can be used for as much of the test route as possible, and to try and choose a day and time when the temperature will be similar and the traffic condition is likely to afford uninterrupted travel as much as possible. It is also desirable to use a GPS with a trip recording feature to ensure that the same speed is used and any variance on test runs can be compared. You should also refuel at the same pump at the same Service Station as there are variances in the accuracy of petrol pumps as well (hard to believe I know!).
 Regardless of whether you intend to perform an “over the road” test, a dynomometer test, a gas analyser test, or any combination of these, once you install the Greentech Fuel Saver you cannot go back and perform additional baseline tests as the fuel in the tank and lines has now been treated and carbon removal from the engine and engine oil has commenced, so even if you remove the Greentech Fuel saver, it would take at least a month or even more to return the engine to a “before” condition.
There are a number of different methods you can use to test the effect of the Greentech Fuel Saver on your vehicle or machine. the method you use may depend up whether you are testing a road going vehicle, or a marine craft, stationary engine, earthmoving machine or other application. It may also depend on the availability of equipment such a gas analyser and whether you want to see you your results as fuel consumption or exhaust emissions. It is worth remembering that results you can measure as exhaust emissions will signify improved consumption as more complete combustion benefits both factors.
Performing Over the Road Test
 There are two ways to perform an over the road test. It is possible to perform a short term test, which is a baseline test run over a clean route and data recorded. After the greentech Fuel Saver is fitted, run the engine at 3/4 of maximum RPM for at least 5 minutes to use up the fuel between the fuel tank and the engine and then top up the tank at the SAME PUMP, wait another 30 minutes and repeat the run. Top up again at the SAME PUMP and compare the results. Depending on the type of vehicle and the installation method for the greentech you may not be able to do both runs on the same day. AS you will have filled up at the end of the baseline run you will have a full fuel tank. It is not advisable to install Greentech when you have a full tank as you may spill fuel. Trucks with fully exposed external tanks may be OK.
You can also do an average test by collecting mileage data over at least six fuel tanks prior to fitting the Greentech Fuel Saver and collecting data on an ongoing basis after fitting Greentech. With older vehicles you may notice your economy improving more and more over time as you engine is cleaned of carbon build up.
Before performing over the road test, please print out the Test Procedure instructions below, read thoroughly and follow the instructions carefully. For performing average mileage test, please also download the Fuel Log in XL format below which has prefilled formula’s to calculate your results for you. Please read the instructions on the log before completing.
Special notes for completing the fuel saver log: The pre-filled formulas require ALL cells to be completed in order to get a final result. It is advisable to print out the log and keep it in your car, filling it in each time you purchase fuel, and then complete the log on your computer once you have all of the data. Be sure to keep your receipts. When completing the price per litre cells, use 3 decimal places. So if the fuel costs $1.39.9c per litre, you will fill in 1.399 and the formula will do the rest. When collecting mileage information, many late model cars only show whole kilometres on the odometer. If you have a 1/10th reading on your odometer then you can fill it in exactly as it is. If not, just use whole kilometres and whilst not ideal, the 1/10ths will average out over the test.
Download Test Procedure
Click here to download Test Procedure document
Download Fuel Saver Log
Click here to download Fuel Saver Log Spreadsheet
 Performing a Dynamometer Test
A Dynamometer test can be completed entirely in a single session. It is possible to measure exhaust content (if the Dyno has that feature) and horsepower/torque changes. It is also possible to check fuel economy as well if you are prepared to fill from a fuel drum. For typical Dyno testing, set up your vehicle and perform testing under load at 60Kmh, 80Kmh and 100Kmh. Record your results. Install Greentech to vehicle. Wait 30 minutes for fuel to become treated. Run the engine for 5 to 10 minutes at 3/4 of full RPM to run through untreated fuel between the fuel tank and the engine. Run the vehicle for at least 60 Km’s on the Dyno to familiarise the ECU with the changed fuel properties. Repeat the full load tests for same time, load and speeds and compare the results. If you would like to check fuel consumption, you will need to fill the tank from a fuel drum to the very top of the fuel neck so you have a visual full tank reference. You will require “accurate” electronic scales to determine the weight of the fuel and drum. Weigh the fuel/drum before the test. Run a Dyno test cycle for at least 100 km’s. Refill fuel tank to your visual full reference point and note the weight of fuel used to refill. Install Greentech to vehicle, allow 30 minutes for fuel to become treated and then run engine at 3/4 full rpm for 5 to 10 minutes to run out untreated fuel. Run the vehicle for at least 60 Km’s on the Dyno to familiarise the ECU with the changed fuel properties. Run Dyno test cycle exactly as the baseline test. Note weight of fuel/drum and top up vehicle fuel tank to visual reference point. Check weight of fuel consumed. Note: Conversion factor for petrol is 0.711, so one litre of petrol weighs 0.711kg at 60°F or 16°C. Remember, if you want to perform both tpes of tests, you will need to do all of your baseline tests before fitting Greentech. Once you have fitted Greentech, you cannot return the vehicle to pre treated condition.
Performing a Gas Analyser Test
For best results testing should be conducted at idle rpm with a warmed up engine. IMPORTANT ! Remember to get all of the baseline readings that you require in the “before” tests, as once you have installed Greentech to the engine, you cannot go back to the pre-installation condition. If you are performing gas analysis in conjunction with either, over the road or chassis dynamometer test, collect your gas results at idle before you do your “before” test runs. If using a dynamometer, you can also collect data for under cruising load as well. Once you have completed all of your baseline tests and recorded your results, you can then install Greentech to your vehicle. As per the fitting instructions, once installed wait 30 minutes for the fuel on board to become treated, and then run the engine at 3/4 of full RPM for 5 to 10 minutes to run out the untreated fuel in the fuel line, and allow the engine ECU to become familiar with the new fuel properties. Then repeat the same test procedure as per you baseline tests. Take your new gas readings and compare the results to those that you have recorded prior to installation. The changes you will see are:
Oxygen:Â Should DECREASE (-) Filtered ambient air enters the engine and forms part of the fuel mixture. Ambient air contains 20.9% O2. In complete combustion, this O2 should be fully consumed as the fuel is burned. Oxygen levels analyzed at the tailpipe indicate unburned O2, and therefore incomplete combustion.
Hydrocarbons:Â Should DECREASE (-) The measurement itself represents unburned fuel and is measured in the ppm (parts per million). Modern automobiles in good running order frequently show 10 ppm or less. Older vehicles with poor catalytic converters may produce more than 100 ppm.
Carbon Dioxide:Â Should INCREASE (+) The level of CO2 is a product of complete combustion and represents the amount of fully burned fuel. Therefore, a higher CO2 level indicates a higher engine efficiency.
Carbon Monoxide:Â Should DECREASE (-) Partially burned fuel results in CO. Carbon Monoxide is the result of incomplete combustion. A modern vehicle should produce less than 0.2% CO.
NOx:Â Should DECREASE (-) NOx generally refers to NO and NO2 (nitric oxide and nitrogen dioxide). This measurement is in ppm and represents the combustion products of burning nitrogen. This occurs at the higher engine temperatures associated with a lean fuel mixture or being under load. Of the NOx output of a typical engine, the NO component will usually make up the highest proportion. Diesel engines are generally associated with higher NOx and particulate emissions. Nox is also the most difficult harmful element to eliminate from exhaust, diesel in particular. Many late model trucks meeting EURO 5 emission standards use “after treatment” systems or products such as ADBLUE to treat NOx after it has been exhausted from the engine. Reducing the engines real Nox output reduces the load on after-treatment systems.
SPECIAL NOTE:Â When conducting gas analysis on an older, or high mileage engine, it is likely that your tests immediately after fitting Greentech may show and increase, rather than a decrease in hydrocarbon output. This is because the engine has significant carbon buildup on the engine itself, which it will immediately begin to burn off causing higher HC readings. This will be evident as in these cases the NOx output will be lower, which is the result of complete combustion confirming your result. Checking the exhaust over time will see the HC reducing.
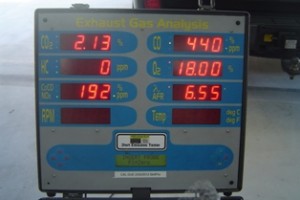
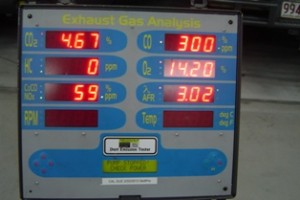
EXAMPLE:Â The example below is a before and after gas analysis on a 2007 Toyota Landcruiser VDJ200 Series 4.5 Litre turbo diesel. The before and after tests were carried out on the same day, so this is a result immediately after fitting Greentech.
Carbon Dioxide: Before 2.13% / After 4.67%. Increase of 119.25%
Hydro Carbons: Before 0% / After 0% Maintaining zero as as good of a result as possible
Carbon monoxide: Before 440 ppm / After 300 ppm. Reduction of 31.82% CO Output
Oxygen: Before 18% / After 14.2%. reduction of 21.11%
Nitrogen Oxides: Before 192 ppm / After 59 ppm. Reduction of 69.27% Nox Output